Logitech G-Hub Scripting Guide
- 1. Setup
- 2. Initialization
- 3. Walkthrough
- 4. Troubleshooting
Setup
This section will walk you through the essential setup steps to ensure your scripts run flawlessly. Following these steps will help you avoid common issues and ensure a smooth scripting experience.
Run G-Hub as an Administrator
The first and most crucial step is to run G-Hub as an administrator. This ensures that the software has full access to your system, which is necessary for the proper functioning of scripts.
ⓘ Why is this important? Running G-Hub as an administrator helps to avoid
frustrating "script not running" errors.
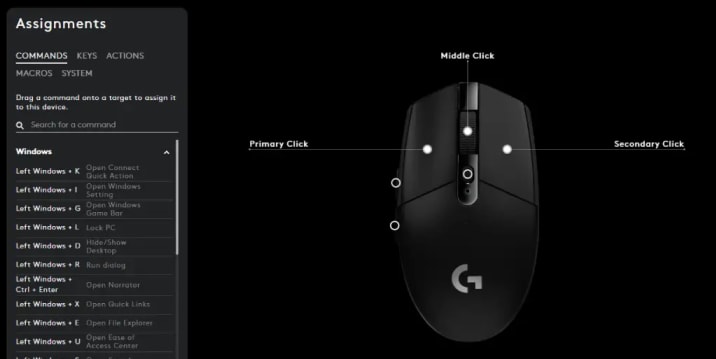
Disable On-board Memory Mode
Next, you need to disable the on-board memory mode in your mouse settings. When this mode is enabled, your mouse uses its internal memory instead of the software settings, which will prevent your macros from loading correctly.

How to disable it:
- Open Logitech G-Hub.
- Locate the On-board Memory Mode icon.
- Click the microchip icon.
By turning this off, you force G-Hub to manage everything, ensuring your scripts are loaded and executed correctly.
Configure DPI Settings
To maintain consistent sensitivity and avoid unexpected speed changes during script execution, it's important to streamline your DPI settings.

What to do:
- If you have multiple DPI stages configured, reduce them to just one.
- Lock the single DPI stage to prevent any changes.
This will ensure your sensitivity remains constant, providing a stable environment for your scripts.
Clear Button Assignments
Before you start scripting, it's a good practice to clear any default or leftover bindings on the buttons you plan to use for your scripts.
Why is this necessary? By unassigning the buttons, you guarantee that your custom macros take priority and there are no conflicts with existing bindings.
Use the Desktop Profile
Finally, make sure you are working in the desktop profile. G-Hub creates profiles for each game by default, but for scripting tutorials and general use, the desktop profile provides a more consistent and straightforward environment.

How to check:
- Go to the settings in G-Hub.
- Navigate to the Presistent Profile section.
- Ensure that the "Desktop" profile is selected and active.
Initialization
This section will walk you through the process of adding a custom LUA script to your Logitech G-Hub software. This allows you to customize the functionality of your Logitech gaming peripherals.
Prerequisites
Before you begin, please ensure you have the following:
- A compatible Logitech gaming mouse or keyboard.
- The Logitech G-Hub software installed on your computer.
How to Add a Custom LUA Script in Logitech G-Hub
Follow these steps carefully to add your custom script:
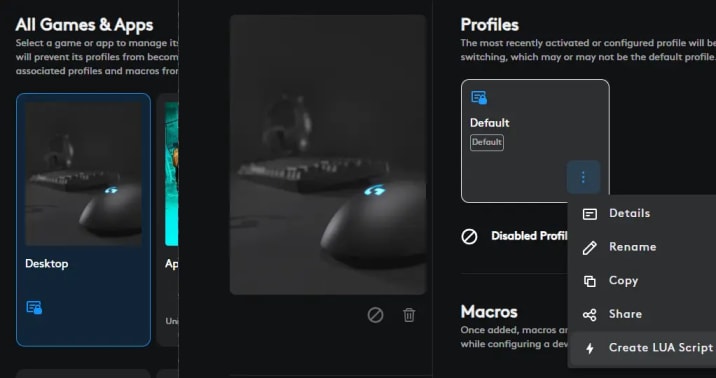
- Open Logitech G-Hub and Select Your Profile
- Launch the Logitech G-Hub software.
- Ensure you are in the Desktop Profile.
- Click on the profile dropdown menu at the top of the window and select Manage Profiles.

-
Navigate to the Scripting Interface
- Select the Desktop profile, then click the ellipsis icon.
-
Create a New Script
- From the dropdown menu, click the Create a New Script button.
- G-Hub will open a script editor with some default boilerplate code.
-
Clear the Default Code
- Select all of the default code in the editor and delete it.
-
Paste Your Custom Script
- Now, paste your custom LUA script into the empty editor. You can do this by going to
Edit > Pasteor by using theCtrl + Vkeyboard shortcut.
- Now, paste your custom LUA script into the empty editor. You can do this by going to
-
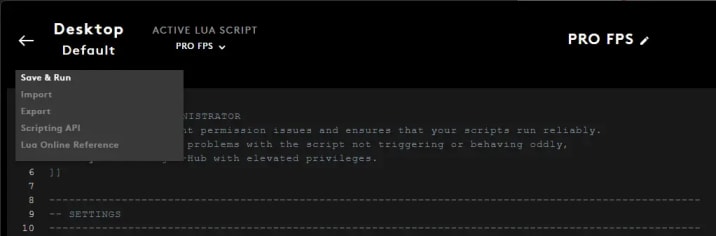
Save and Run the Script
- Finally, go to the Script menu and click Save and Run. This will activate your custom script.
Important Notes
- Saving and Reloading: Any time you make a change to your script, you'll need to save it and run it again to apply the changes. You can do this by clicking Save and Run from the menu or by using the
Ctrl + Skeyboard shortcut. - Troubleshooting: If your script isn't working as expected, double-check the code for any errors and make sure you've followed all the steps correctly.
Walkthrough
This section will walk you through the script's functionalities, settings, and how to effectively customize it for your preferences and various in-game weapons.
Script Versions
Our script comes in three versions:
- Lite: Ideal for games with simpler recoil patterns.

Related
Lite FPS Logitech No Recoil Script (G-Hub Mouse Anti Recoil Macro)
view details
- Pro: Designed to handle advanced weapon recoil patterns.

Related
Pro FPS Logitech No Recoil Script (G-Hub Mouse Anti Recoil Macro)
view details
Each section of the script is meticulously described, ensuring that even new users can easily understand and adapt it.
Lite Script Settings
The Lite version is ideal for games with simpler recoil patternsbuttonArg
- Which mouse button starts/stops the recoil script
- 1 = Left Primary Mouse Button
activateKey
- Which keyboard lock key toggles recoil on/off
- Options include "capslock", "numlock", or any other key name supported by G-Hub.
- When this key is active (LED on), shooting will apply recoil compensation;
- when off, clicking will behave normally.
profileCycleButton
- Which mouse button cycles through your weapon profiles
- Common choices:
- 4 or 5 = thumb buttons on most gaming mice
- 6 = DPI-cycle button (if unused for DPI)
- Pressing this button will switch to the next recoil profile in the list.
recoilProfiles
-
name:
- The name of the weapon profile
-
Recoil directions:
- vertical:
Positive = move mouse down (counter upward recoil) Negative = move mouse up
- horizontal:
Positive = move mouse right Negative = move mouse left
- vertical:
-
Notes:
- You can add new weapons here by following the same format
- It’s BEST to place your MAIN WEAPON as the first profile, since it is selected by default when the script starts
- Values bellow are just an example, you should adjust them to your own weapon recoil pattern
- For greater precision and improved weapon recoil management, upgrade to the Pro version, which includes advanced control features
counterLimit
- Stop recoil after this many steps
startAfterCounter
- Number of shots (iterations) to ignore before starting recoil compensation.
- Use if your first few bullets have very low recoil in-game.
- Set to 0 to start compensating immediately on the very first shot.
- Increase if you want to “skip” initial recoil.
Pro Script Settings
The Pro version includes advanced features for handling complex recoil patternstriggerButtons
- Set your button combination here. The script will only activate when ALL buttons are held.
- The LAST button in the list is the one that triggers the firing.
{1}= Default (Left Click only){2}= Right Click only{2, 1}= Hold Right Click (2) AND press Left Click (1){5, 2, 1}= Hold Forward Thumb (5) AND Right Click (2) AND press Left Click (1)
activateKey
- Which keyboard lock key toggles recoil on/off?
- Options include "capslock", "numlock", or any other key name supported by G-Hub.
- When this key is active (LED on), shooting will apply recoil compensation;
- when off, clicking will behave normally.
recoilProfiles
-
name:- The name of the weapon profile
-
assignButton:- The specific mouse button that will immediately activate this profile.
- Examples: 4 (back thumb), 5 (forward thumb), 6 (DPI shift), etc.
-
bulletsPerEntry:- This value is used to determine which pattern entry applies for the current shot
(e.g. if bulletsPerEntry is 5, the script will use the first 5 bullets to apply the pattern entry)
- If bulletsPerEntry is missing or invalid, the script will fall back to 1 as a safe minimum
- You should always define it explicitly
- It's best to set it to 1 for games where precision is critical
- Higher values are more suitable for games where precision is less critical
- This value is used to determine which pattern entry applies for the current shot
-
pattern:- The pattern of the weapon profile.
- Recoil Directions:
vertical:
- Positive = move mouse down (counter upward recoil)
- Negative = move mouse up
horizontal:- Positive = move mouse right
- Negative = move mouse left
-
Notes:
- You can add new weapons here by following the same format
- It’s BEST to place your MAIN WEAPON as the first profile, since it is selected by default when the script starts
- Values below are just an example, you should adjust them to your own weapon recoil pattern
inGameSensitivity
- In-Game Mouse Sensitivity
- Set this to match your in-game sensitivity
- This option makes future sensitivity changes easier to manage
randomnessStrength
- Strength of randomness applied to horizontal and vertical recoil
- 0 = No randomness (exact pattern every time)
- 2 = Recoil values fluctuate by up to ±2 pixels per shot
trackMovement
- Return to original position after shooting
- Set to "true" to enable automatic return
- Set to "false" to stay where it ends up
recoilDelay
- How long (in milliseconds) to wait between each tiny mouse movement.
- Lower = faster compensation (more aggressive recoil control),
- higher = slower (smoother but less precise).
counterLimit
- Stop recoil after this many steps
startAfterCounter
- Number of shots (iterations) to ignore before starting recoil compensation.
- Use if your first few bullets have very low recoil in-game.
- Set to 0 to start compensating immediately on the very first shot.
- Increase if you want to “skip” initial recoil.
smoothingSteps
- How many tiny sub-steps to split each recoil movement into.
- More steps = smoother, gradual movement.
- Fewer steps = chunkier movement but potentially more accurate for high-speed recoil.
Tuning Your Recoil
To effectively tune your weapon profiles:
- Enter Training Mode:
- Go into your game's training mode and stand a few meters from a wall to clearly see your bullet impacts.
- Select the correct profile:
- Press the profile
assignButtonfor the weapon you want to tune. - The current profile is shown in the script console when the script is active.
- Activate the script:
- Enable your
activateKeylock key (for example,capslock). - Hold any trigger modifiers and press your fire button (
triggerButtons) to start recoil control.
- Observe the bullet pattern: Fire at the wall.
- If shots are climbing too high, increase the vertical value.
- If shots are going too low, decrease the vertical value.
- If shots are drifting right, make the horizontal value more negative.
- If shots are drifting left, make it more positive.
- Repeat and refine: Continuously fire, check the spray, and adjust the values until the pattern flattens.
When you set up recoil patterns in the script, you’re telling it how much to pull down (vertical) and how much to move left/right (horizontal) for each shot or grouped shots.
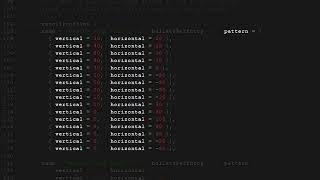
In the weapon entry, you’ll see something like this:
{ name = "NAME THE WEAPON 1", assignButton = 4, bulletsPerEntry = 2, pattern = {
  { vertical = 32, horizontal = -8 }, -- controls bullets 1 and 2
  { vertical = 24, horizontal = 6 },  -- controls bullets 3 and 4
  { vertical = 26, horizontal = -4 }, -- controls bullets 5 and 6
  { vertical = 26, horizontal = 0 }   -- controls bullets 7 and 8
}}
-
assignButtonswitches the active profile immediately. -
bulletsPerEntry = 2means each pattern entry covers 2 bullets. → The first line controls bullets 1 and 2, the next line controls bullets 3 and 4, and so on. -
If the pattern ends early, the script continues using the last defined entry.
-
Adjusting vertical recoil: → If shots still climb up, increase the vertical value. → If shots drop too low, decrease the vertical value.
-
Adjusting horizontal recoil: → If shots drift right, make the horizontal value more negative. → If shots drift left, make the horizontal value more positive.
-
startAfterCounterlets you ignore the first few shots before compensation begins. → Set it to0for immediate recoil control. → Increase it if the first shot or two have lower recoil than the rest. -
smoothingStepssplits each recoil correction into smaller sub-steps. → Higher values make movement smoother. → Lower values make each correction more direct. -
randomnessStrengthadds a small random offset to the recoil values. → Use0for the exact same pattern every time. → Increase it slightly to make recoil less predictable.
ⓘ Set
bulletsPerEntry to 1 for the highest precision, especially in games like CS2. Larger values are better for arcade-style FPS games where exact per-shot control is less critical.Repeat the process: fire at the wall, check where the bullets land, then adjust the numbers until the spray flattens.
G-Hub Console Feedback
Logitech G-Hub provides live feedback in the console window, which is crucial for monitoring your script.
- Opening the Console: Go to the top menu, click View, then Console.
- Status Box: The script will display a status box in the console:
- Status:
- Red: Recoil is off.
- Green: Recoil script is active.
- Profile: Shows the currently active weapon profile. This updates when you press your profile cycle button.
- Status:
==================================
 Status  | 🔴
 Profile | PROFILE NAME 1
==================================

==================================
 Status  | 🟢
 Profile | PROFILE NAME 1
==================================
Troubleshooting
Logitech no recoil script not working? Common issues and their solutions when working with Logitech G-Hub script. From admin settings to Lua macros, get your recoil script working again!
Disable Logitech G-Hub at Startup and Restart Your PC
- Open Task Manager: Right-click your taskbar and choose Task Manager.
- Go to Startup Apps: In Task Manager, click the Startup tab.
- Disable G-Hub: Find the Logitech G-Hub entry. If it’s enabled, right-click it and select Disable.
- Restart PC: Even if it was already disabled, reboot your computer. A full restart can clear weird startup bugs.
Disabling G-Hub from auto-launch and restarting can clear up lockups. Many gamers report that a fresh reboot after disabling startup solved their “script not working” issue. It sounds simple, but sometimes Windows needs a clean slate for G-Hub to behave.
Run Logitech G-Hub as Administrator
- Find the G-Hub app: Click your Start menu, type Logitech G-Hub, but don’t open it normally.
- Run as Admin: Right-click the G-Hub app and choose Run as administrator. When prompted, click Yes.
Running G-Hub in admin mode ensures it has all the permissions it needs. This single step has helped tons of players fix their Logitech scripts. It avoids permission roadblocks that could be stopping your macro from activating in-game.
Turn Off Steam’s “Run as Administrator” (if you use Steam)
- Locate Steam: Find your
Steam.exe(usually in C:\Program Files (x86)\Steam\). - Change Properties: Right-click
Steam.exe, go to Properties → Compatibility. - Uncheck Admin: Make sure Run this program as an administrator is unchecked. Click Apply and OK.
- Restart Steam: If Steam was open, close it and relaunch normally.
Some users discovered that if Steam is running as admin, Logitech macros only fire on the desktop and not in-game. Disabling admin for Steam can let G-Hub’s macros work correctly while you play.