User Guide
This guide helps you get started with desktop automation quickly and safely.

Quick Start
- Download & Install from scriptsmonkey.com/macro
- Launch and sign in (required for free tier)
- Create your first macro with our step-by-step guide
- Set a hotkey trigger to run your automation
- Test and refine until it works perfectly
Guide Navigation
Essential Guides
- 🚀 Quick Start – Installation, interface tour, and first macro
- 🛠️ Creating Macros – Build automations with step‑by‑step instructions
- ⌨️ Triggers & Hotkeys – Configure hotkeys and trigger modes
- 🗂️ Organizing Macros – Folders, import/export, and management
Reference & Safety
- ⚙️ Settings & Preferences – Key configuration options
- 🌟 Account & Premium – Free vs premium, authentication
- 🛡️ Safety & Best Practices – Emergency stop, rate limiting, ethical use
- 🔧 Troubleshooting & FAQ – Common issues and solutions
Need Help?
- Community Support: Join our Discord
Installation
Download the installer from scriptsmonkey.com/macro and follow the setup wizard.
System Requirements:
- Windows 10/11
- 4GB RAM (8GB recommended)
- 200MB free space
First Launch
When you open ScriptsMonkey for the first time:
- Sign in – Required for the free tier (60 minutes every 12 hours). You can use Google, Discord, or Twitch accounts.
- Skip or follow the quick tutorial – You can always revisit it from the Help menu.
- Explore the interface – The main window is divided into:
- Sidebar: Navigation, macro list, and folders
- Playground: Where you build and test macros
- Header: Macro name, description, and time remaining
Creating Your First Macro
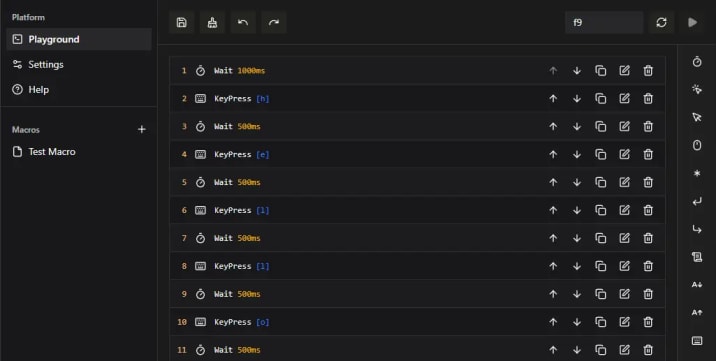
Let’s automate typing “Hello World”:
- Click New Macro in the sidebar.
- Name it “Test Macro” (optional description).
- From the action palette on the right, add a Delay action and set it to 1000ms.
- Add a Key Press action, select the
Hkey. - Add another Delay (500ms), then add key presses for the remaining letters:
e,l,l,o,Space,W,o,r,l,d. - Click Set Trigger, press
F9, and choose thetrigger_runmode. - Save your macro (Ctrl+S).
To test: Make sure the macro is active (green play button), press
F9, and watch the text appear.Core Concepts
- Macro: A sequence of automated actions (mouse moves, key presses, delays).
- Action: A single step in a macro.
- Trigger: A hotkey that starts the macro.
- Trigger Modes:
trigger_run: Tap hotkey to run once (default)hold_loop: Hold to repeat, release to stopone_shot: Hold to run once, can release anytime
Free Tier vs Premium
| Feature | Free Tier | Premium |
|---|---|---|
| Usage Time | 60 minutes every 12 hours | Unlimited |
| Cloud Sync | No | Yes |
| Priority Support | Standard | Priority |
| Price | Free | $9.99/month |
Next Steps
- Try different actions (mouse moves, clicks, scrolling)
- Adjust delays for perfect timing
- Organize macros with folders
- Learn more in Creating Macros
Creating Macros
Build automations with a simple step‑by‑step process.
1. Plan Your Automation
Before you start, answer these questions:
- Which application will the macro run in?
- What exact steps are needed? (List each mouse/keyboard action)
- What timing is required between steps?
- How will you activate the macro? (Hotkey)
- What could go wrong? (Plan for errors)
Example – Copy and Paste:
- Select all text (Ctrl+A)
- Copy (Ctrl+C)
- Switch to target app (Alt+Tab)
- Wait 500ms for it to load
- Paste (Ctrl+V)
2. Create a New Macro
- Click + New Macro in the sidebar, or press Ctrl+N.
- Give it a descriptive name (e.g., “Invoice Data Entry”).
- Add an optional description to explain its purpose.
3. Add Actions
The action palette on the right contains all available actions:
| Icon | Category | Actions |
|---|---|---|
| 🕒 | Delay | Wait a specified time |
| 🖱️ | Mouse | Move, Click, Scroll |
| ⌨️ | Keyboard | Key Press, Key Down, Key Up |
| 💬 | Comment | Add notes (not executed) |
| ⏭️ | Skip Point | Loop control (advanced) |
To add an action:
- Click a category in the palette.
- Choose the specific action type.
- Configure its parameters (click to edit).
Essential Tips:
- Delays: Start with longer delays (1000ms) and reduce after testing.
- Mouse Moves: Use absolute coordinates (e.g., 500, 300) or relative moves (+100, -50).
- Clicks: Choose from single, double, hold, or separate down/up.
- Keyboard: Use standard key names (
Control,Shift,Enter). For combinations, writeControl+C. - Comments: Add notes to document your macro—they don’t affect execution.
4. Set a Trigger
- Click the Set Trigger button in the playground.
- Press your desired hotkey (e.g.,
F9). - Choose a trigger mode:
trigger_run(default): Tap hotkey to run once.hold_loop: Hold to repeat, release to stop.one_shot: Hold to run once, can release anytime.
- Click Save.
Hotkey Tips:
- Avoid system shortcuts (Ctrl+Alt+Delete, Win+L).
- Use modifier combinations like
Ctrl+Shift+F. - Keep a list of your hotkeys to avoid conflicts.
5. Test and Refine
- First test in a safe environment (e.g., Notepad).
- Have the emergency stop (Ctrl+Shift+Esc) ready.
- Press your trigger hotkey and watch the macro run.
- Adjust delays, coordinates, and order as needed.
Common Issues:
- Macro doesn’t trigger: Check that the macro is active (green play button) and ScriptsMonkey is running.
- Mouse misses target: Update screen coordinates or use relative moves.
- Timing inconsistent: Add buffer delays and account for system load.
6. Save and Organize
- Save your macro with Ctrl+S.
- Use folders (drag macros in the sidebar) to keep your collection tidy.
- Export macros as
.jsonfiles to share or backup.
Next Steps
- Try different actions and fine‑tune timing.
- Explore Triggers & Hotkeys for more trigger options.
- Learn how to organize your macros in Organizing Macros.
- For a complete list of actions, see Action Reference.
Triggers & Hotkeys
A trigger is a hotkey that starts your macro. Triggers work globally—they activate no matter which application has focus.
Setting a Trigger
- Open your macro in the playground.
- Click the Set Trigger button in the bottom toolbar.
- Press the key combination you want to use (e.g.,
F9,Ctrl+Shift+F). - Choose a trigger mode from the dropdown.
- Click Save.
Trigger Modes
ScriptsMonkey offers three modes:
| Mode | Behavior | Best For |
|---|---|---|
trigger_run | Tap hotkey to run once. | Form filling, data processing, most tasks. |
hold_loop | Hold hotkey to repeat; release to stop. | Rapid clicking, continuous scrolling. |
one_shot | Hold hotkey to run once; can release anytime. | Safety‑critical operations, manual control. |
trigger_run is the default and recommended for most macros.Choosing Hotkeys
Good choices:
- Function keys:
F9,F10,F11,F12 - Modifier combinations:
Ctrl+Shift+Letter,Alt+Shift+Number - Numpad keys (with NumLock off)
Avoid:
- System shortcuts:
Ctrl+Alt+Delete,Alt+F4,Win+L - Common application shortcuts:
Ctrl+S(Save),Ctrl+C(Copy) - Single common keys:
A,Enter,Space,Tab
Tips:
- Pick easy‑to‑reach keys for frequently used macros.
- Use more complex combinations for dangerous macros.
- Keep a list of your hotkeys to avoid conflicts.
Safety
- Emergency stop: Press
Ctrl+Shift+Escto halt all macros immediately. - For macros that could cause harm, use
one_shotmode or add a confirmation delay. - Regularly review your trigger assignments.
Troubleshooting
Macro doesn’t trigger:
- Make sure the macro is active (green play button).
- Check that ScriptsMonkey is running.
- Test the hotkey in a simple text editor first.
Wrong macro activates:
- Look for duplicate hotkeys.
- Verify the correct macro is selected in the sidebar.
Next: Keep your macros organized with Organizing Macros.
Organizing Macros
Keep your macros tidy with folders, search, import/export, and duplication.
Folders
Create a folder:
- Drag a macro onto empty space in the sidebar, or
- Right‑click in the sidebar and choose New Folder.
Organize:
- Drag macros into folders.
- Drag folders to reorder or nest them (up to 3 levels).
- Right‑click a folder to rename or delete it (deleting a folder moves its macros to the root).
Tip: Use clear, short names for folders (e.g.,
Work, Personal, Games).Import & Export
Export a macro (to share or backup):
- Right‑click the macro in the sidebar and select Export.
- A
.jsonfile is saved with all the macro’s data.
Import a macro:
- Right‑click in the sidebar (or a folder) and choose Import.
- Select the
.jsonfile; the macro appears in the current location.
Use cases:
- Back up important macros.
- Share useful automations with others.
- Move macros between computers.
Duplicate & Templates
Duplicate a macro:
- Right‑click a macro and select Duplicate.
- The copy appears with
_copyadded to its name.
Create a template:
- Build a macro with placeholder actions (e.g., “UPDATE COORDINATES”).
- Name it with
[TEMPLATE]prefix. - Duplicate it whenever you need a similar macro, then fill in the details.
Search
The search box at the top of the sidebar filters macros by name and description as you type.
Tip: Include keywords in your macro descriptions to make them easier to find.
Best Practices
- Start with a simple folder structure and refine as your collection grows.
- Regularly delete test macros and archive old versions.
- Export your important macros periodically as a backup.
Next: Customize the application in Settings & Preferences.
Action Reference
Quick reference for all available actions in ScriptsMonkey.
Delay Actions
Pause execution for a specified time.
| Parameter | Type | Description | Example |
|---|---|---|---|
| Duration | Integer (ms) | Time to wait in milliseconds | 1000 (1 second) |
Use case: Wait for an application to load, create rhythm between actions.
Example:
Delay: 2000ms # Wait 2 seconds
Mouse Actions
Mouse Move
Move the cursor to a screen position.
| Parameter | Type | Description | Example |
|---|---|---|---|
| Type | absolute or relative | Move type | absolute |
| X | Integer | Horizontal coordinate/offset | 500 |
| Y | Integer | Vertical coordinate/offset | 300 |
Examples:
# Move to exact coordinates (top‑left is 0,0)
Type: absolute
X: 500
Y: 300

# Move 100px right, 50px down from current position
Type: relative
X: 100
Y: 50
Mouse Click
Perform a mouse button click.
| Parameter | Type | Description | Example |
|---|---|---|---|
| Button | left, right, middle | Which button to click | left |
| Type | single, double, down, up, hold | Click type | single |
| Duration | Integer (ms) | Hold time (for hold type) | 500 |
Examples:
# Single left‑click
Button: left
Type: single

# Right‑click and hold for 1 second
Button: right
Type: hold
Duration: 1000
Mouse Scroll
Scroll vertically or horizontally.
| Parameter | Type | Description | Example |
|---|---|---|---|
| Direction | vertical or horizontal | Scroll direction | vertical |
| Amount | Integer | Scroll units (positive = down/right) | 5 |
Example:
Direction: vertical
Amount: -10 # Scroll up 10 lines
Keyboard Actions
Key Press
Press and/or release a key or combination.
| Parameter | Type | Description | Example |
|---|---|---|---|
| Key | String | Key name or combination | A, Enter, Control+C |
| Type | press, down, up | Action type | press |
Key names: Letters (
A‑Z), numbers (0‑9), function keys (F1‑F24), modifiers (Control, Shift, Alt, Meta), navigation (Enter, Tab, Space, Escape), arrows (ArrowUp, etc.).Examples:
# Type the letter 'A'
Key: A
Type: press

# Press Ctrl+C (copy)
Key: Control+C
Type: press

# Hold Shift key down
Key: Shift
Type: down

# Release Shift key
Key: Shift
Type: up
Comment Actions
Add a non‑executing note to your macro.
| Parameter | Type | Description | Example |
|---|---|---|---|
| Text | String | Comment content | "Start of form section" |
Use case: Document your macro, leave TODOs, mark sections.
Example:
Text: "=== FORM FILLING SECTION ==="
Skip Point Actions
Mark a position to jump to on subsequent loop iterations (advanced).
| Parameter | Type | Description | Example |
|---|---|---|---|
| Label | String | Optional identifier | "loop_start" |
Used with loop counts > 1. See Creating Macros for details.
Next: Configure how your macros start with Triggers & Hotkeys.
Settings & Preferences
Customize ScriptsMonkey to fit your workflow.
Accessing Settings
Click the ⚙️ Settings icon in the sidebar, or press Ctrl+2 (Windows/Linux) / Cmd+, (macOS).
Appearance
Theme:
- Dark mode (default) – dark background, light text.
- Light mode – light background, dark text.
Interface scale: Adjust with Ctrl+Mouse Wheel or the slider in settings. Useful for high‑DPI displays or accessibility.
Animations: Toggle on/off for smooth transitions (minimal performance impact).
Sound
Enable or disable sound feedback for:
- Macro start/complete
- Error alerts
- Trigger activation
- Emergency stop
Volume: Adjust the master slider or mute entirely.
Hotkeys
Configure global hotkeys:
- Default macro trigger:
F9(can be changed) - Active toggle:
F10(enable/disable all macros) - Emergency stop:
Ctrl+Shift+Esc(fixed, cannot be changed)
ScriptsMonkey warns you about potential conflicts with system or application shortcuts.
Safety
Rate limiting: Prevent system overload and anti‑cheat detection.
- Minimum delay between actions: 10ms (default). Increase for gaming or slower systems.
- Maximum actions per second: 100 (default).
Application allowlist (future): Restrict macros to run only in specific applications.
Updates
Check frequency: Daily, weekly (default), monthly, or manual.
Update channels:
- Stable – fully tested releases (recommended).
- Beta – preview new features (may be unstable).
- Alpha – development builds (unstable).
Manual check: Click Check for Updates in the Update settings.
Data
Storage location: Default is your system’s application data folder. Advanced users can choose a custom path.
Backup & restore:
- Create manual backups anytime.
- Set up automatic backups (daily, weekly, monthly).
- Restore from a backup file if needed.
Export/import all data: Useful for migration or archiving.
Next: Learn about free vs premium features in Account & Premium.
Account & Premium
ScriptsMonkey offers a free tier with usage limits and a premium tier with unlimited automation.
Authentication
You need to sign in to use ScriptsMonkey (even the free tier). This prevents abuse of the 60‑minute limit and lets you upgrade to premium later.
Sign‑in providers: Google, Discord, or Twitch.
Multiple devices: You can use the same account on different computers; usage aggregates across all devices.
Free Tier
60 minutes every 12 hours – you can run macros for up to 60 minutes in a rolling 12‑hour window. Only time when macros are actively executing counts toward the limit.
Included features:
- All macro creation and editing tools.
- All action types (delay, mouse, keyboard, etc.).
- Folder organization, import/export.
- Basic trigger configuration.
- Safety features (emergency stop, rate limiting).
Managing your time:
- The header shows minutes remaining.
- Plan longer automation sessions to stay within the limit.
- You’ll see warnings when you’re close to running out.
Premium Tier
Unlimited usage – run macros as long as you need, with no 12‑hour cycles.
Priority support – faster email responses, direct developer access in Discord, and beta feature access.
Additional premium features (future):
- Advanced triggers (conditional, scheduled, etc.).
- Analytics and reporting.
- Team/enterprise management.
Pricing
Monthly: $9.99/month
Team/Enterprise: Custom pricing
Team/Enterprise: Custom pricing
Payment methods: Credit/debit cards.
Upgrading: Click Upgrade to Premium in the sidebar user panel, choose a plan, and enter payment details. Activation is immediate.
Next: Follow Safety & Best Practices to automate responsibly.
Safety & Best Practices
Automation is powerful—use it responsibly.
Emergency Stop
Ctrl+Shift+Esc – press this combination to immediately halt all macros, release held keys, and reset mouse state.When to use: Any time a macro does something unexpected, the system becomes unresponsive, or you need to stop instantly.
Practice: Know this hotkey by heart and test it in a safe environment.
Rate Limiting
Prevent system overload and anti‑cheat detection by adjusting:
- Minimum delay between actions: 10ms (default). Increase to 50‑100ms for productivity macros, 100‑500ms for gaming.
- Maximum actions per second: 100 (default).
Signs of overload: input lag, application freezing, high CPU usage. If you see these, stop macros and increase delays.
Safe Macro Design
Test in a sandbox first (e.g., Notepad or an empty desktop) before using real data.
Add confirmations for dangerous actions (e.g., wait for a manual click on “OK”).
Set timeouts for loops—don’t create infinite loops without an escape.
Include recovery steps so that if the macro is interrupted, held keys are released and the mouse is reset.
Avoid dangerous patterns:
- Rapid clicking without delays (can overload the system).
- File operations without backups or confirmation.
- Infinite loops with no way to stop.
Testing
Start small: Test each action individually, then the whole sequence.
Use dummy data, never production or sensitive information.
Monitor performance with Task Manager and screen recordings.
Ethical Use
Gaming: Check the game’s Terms of Service. Automation that provides a competitive advantage or bots multiplayer games can lead to permanent bans.
Workplace: Follow your company’s IT policies, obtain approvals, and document your automations.
Data privacy: Never use real sensitive data in test macros. Secure macro files that contain business logic.
Regular Safety Check
- Review your macros periodically for safety issues.
- Ensure the emergency stop still works.
- Update rate limiting and allowlists as needed.
Next: Solve common problems in Troubleshooting & FAQ.
Troubleshooting & FAQ
Quick Steps
- Emergency stop: Press
Ctrl+Shift+Esc. - Restart ScriptsMonkey.
- Check for updates (Settings → Updates → Check now).
- Reinstall ScriptsMonkey.
Installation
Windows – installer fails:
- Ensure Windows 10/11, 4GB RAM, 200MB free space.
- Install Visual C++ Redistributable.
- Temporarily disable antivirus, then add an exception for ScriptsMonkey.
Macro Execution
Macro doesn’t trigger:
- Check that the macro is active (green play button).
- Verify ScriptsMonkey is running (system tray/taskbar).
- Test the hotkey in Notepad first (if characters appear, the hotkey works).
- Close other automation software.
Macro runs but actions don’t work:
- Increase delays between actions.
- Update mouse coordinates (screen resolution or window position may have changed).
- Make sure the target application is in the foreground (add an
Alt+Tabaction if needed).
Macro runs too fast/slow:
- Adjust the minimum delay between actions in Safety settings.
- Add/remove delays in the macro itself.
Interface & Performance
ScriptsMonkey is slow/laggy:
- Close unused macros and collapse folders.
- Export and archive old macros.
- Update to the latest version.
Interface elements missing/wrong size:
- Adjust interface scale.
- Move ScriptsMonkey to your primary monitor.
Authentication & Account
Can’t sign in:
- Allow pop‑ups for scriptsmonkey.com.
- Check that Google/Discord/Twitch is not down.
- Ensure internet connection and firewall allow ScriptsMonkey.
Premium not activating after purchase:
- Wait 5–10 minutes for processing.
- Sign out and back in.
- Contact support with your transaction ID.
Time remaining shows incorrectly:
- Verify system clock is accurate.
- Usage aggregates across all devices signed into your account.
Data & Files
Macros lost after update/reinstall:
- Always export important macros as backup.
- Look for backup files in
%APPDATA%\ScriptsMonkey\backups\(Windows)
Import/export not working:
- Ensure the file is valid JSON (open in a text editor).
- Check that the exported version matches your ScriptsMonkey version.
- Try exporting/importing a single macro first.
FAQ
Is ScriptsMonkey safe to use?
Yes, when used responsibly. It includes emergency stop, rate limiting, and (future) application allowlists. Always test macros in a safe environment first.
Yes, when used responsibly. It includes emergency stop, rate limiting, and (future) application allowlists. Always test macros in a safe environment first.
Can I use ScriptsMonkey for gaming?
Check the game’s Terms of Service. Automation that provides a competitive advantage or bots multiplayer games can lead to bans.
Check the game’s Terms of Service. Automation that provides a competitive advantage or bots multiplayer games can lead to bans.
Is my data sent to your servers?
Only authentication and update checks. Your macros stay on your device.
Only authentication and update checks. Your macros stay on your device.
How do I update ScriptsMonkey?
Settings → Updates → Check now. Automatic updates can be enabled.
Settings → Updates → Check now. Automatic updates can be enabled.
Can I schedule macros to run at specific times?
Not in the current version. Macros must be triggered manually via hotkeys.
Not in the current version. Macros must be triggered manually via hotkeys.
Why do I need to sign in for the free tier?
Authentication prevents abuse of the 60‑minute limit and provides an upgrade path to premium.
Authentication prevents abuse of the 60‑minute limit and provides an upgrade path to premium.
Contact Support
Community:
- Discord community server
When contacting support, include:
- ScriptsMonkey version (Settings → About).
- Operating system and version.
- Steps to reproduce the issue.
- Error messages (screenshots help).
- What you’ve already tried.
Still stuck? Review Safety & Best Practices or explore advanced techniques in Creating Macros.