Introduction
Ever loaded up your Logitech G HUB with a slick no recoil script only to have it not work? Don’t panic! Lots of us have been there - shooting with a busted macro is a headache. The good news is, most “Logitech script not working” glitches are fixable. This guide shows you exactly how to fix Logitech script issues so your no recoil macro kicks in again. We’ll walk through each tweak in a laid-back, gamer-friendly way. By the end, your Logitech G HUB script should be firing on all cylinders!
1. Disable Logitech G HUB at Startup and Restart Your PC
- Open Task Manager: Right-click your taskbar and choose Task Manager.
- Go to Startup Apps: In Task Manager, click the Startup tab.
- Disable G HUB: Find the Logitech G HUB entry. If it’s enabled, right-click it and select Disable.
- Restart PC: Even if it was already disabled, reboot your computer. A full restart can clear weird startup bugs.
Disabling G HUB from auto-launch and restarting can clear up lockups. Many gamers report that a fresh reboot after disabling startup solved their “script not working” issue. It sounds simple, but trust us - sometimes Windows needs a clean slate for G HUB to behave.
2. Run Logitech G HUB as Administrator
- Find the G HUB app: Click your Start menu, type Logitech G HUB, but don’t open it normally.
- Run as Admin: Right-click the G HUB app and choose Run as administrator. When prompted, click Yes.
Running G HUB in admin mode ensures it has all the permissions it needs. This single step has helped tons of players fix their Logitech scripts. It avoids permission roadblocks that could be stopping your macro from activating in-game.

3. Turn Off Steam’s “Run as Administrator” (if you use Steam)
- Locate Steam: Find your Steam.exe (usually in
C:\Program Files (x86)\Steam\). - Change Properties: Right-click Steam.exe, go to Properties → Compatibility.
- Uncheck Admin: Make sure Run this program as an administrator is unchecked. Click Apply and OK.
- Restart Steam: If Steam was open, close it and relaunch normally.
Some users discovered that if Steam is running as admin, Logitech macros only fire on the desktop and not in-game. Disabling admin for Steam can let G HUB’s macros work correctly while you play.
4. Disable Onboard Memory in G HUB
- Open G HUB: Launch Logitech G HUB (as admin, as above).
- Select Your Mouse: Click on your Logitech mouse icon.
- Find On-Board Memory: In the mouse settings, look for an On-Board Memory or Memory switch. If it’s On, turn it Off.
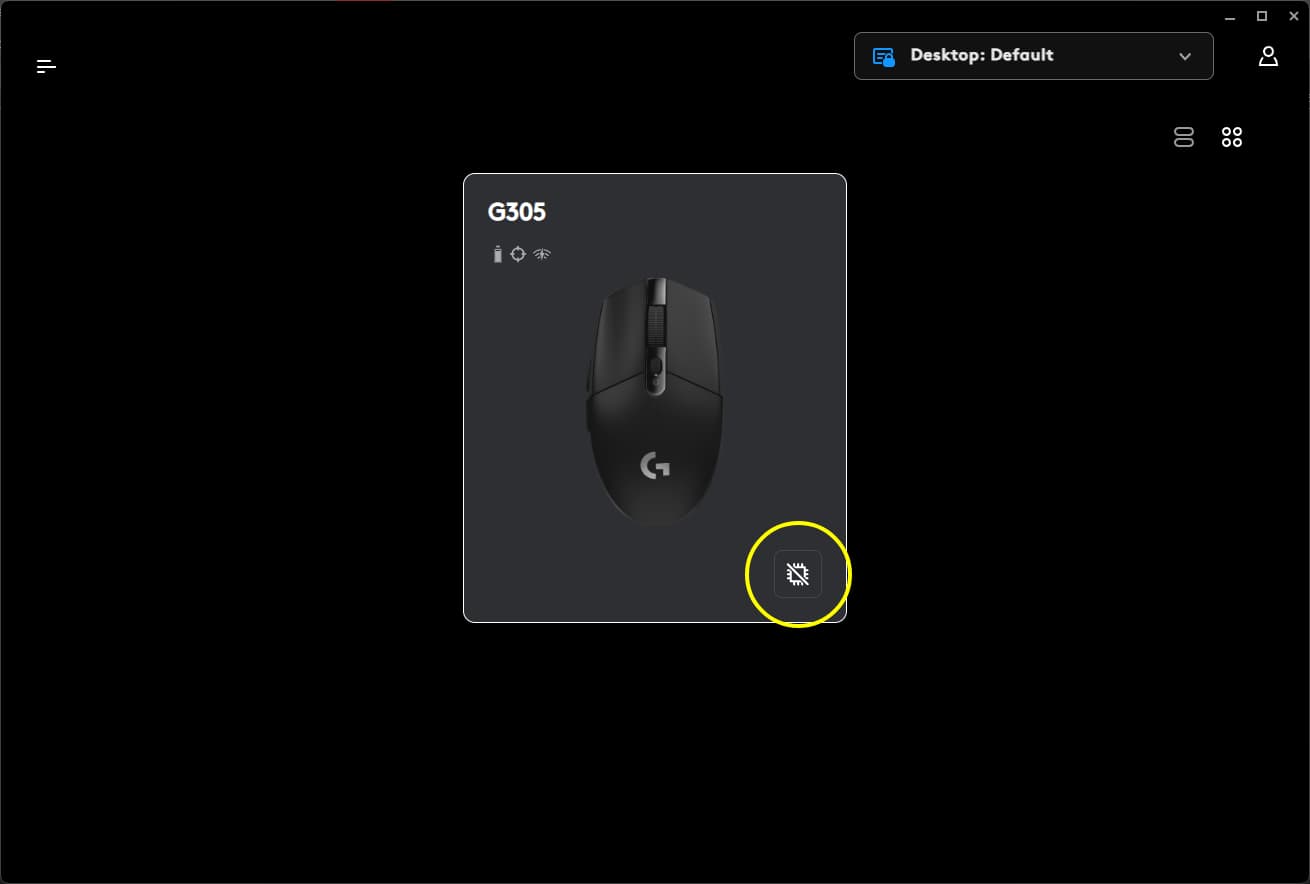
On-board memory mode is handy for lighting or saving profiles on the mouse itself, but it often breaks Lua macros. In fact, players have reported their macros flat-out not working when On-Board Memory is enabled. Disabling it forces G HUB to handle the macro in software, which is what we want.
5. Use a Single DPI Setting and Lock It
- Go to DPI Settings: In G HUB, open your mouse and navigate to the DPI section.
- Remove Extra DPIs: Delete or disable all but one DPI setting. Pick the DPI you’ll actually use.
- Lock the DPI: Enable the Lock or DPI Lock feature so the cursor speed stays constant at that stage.
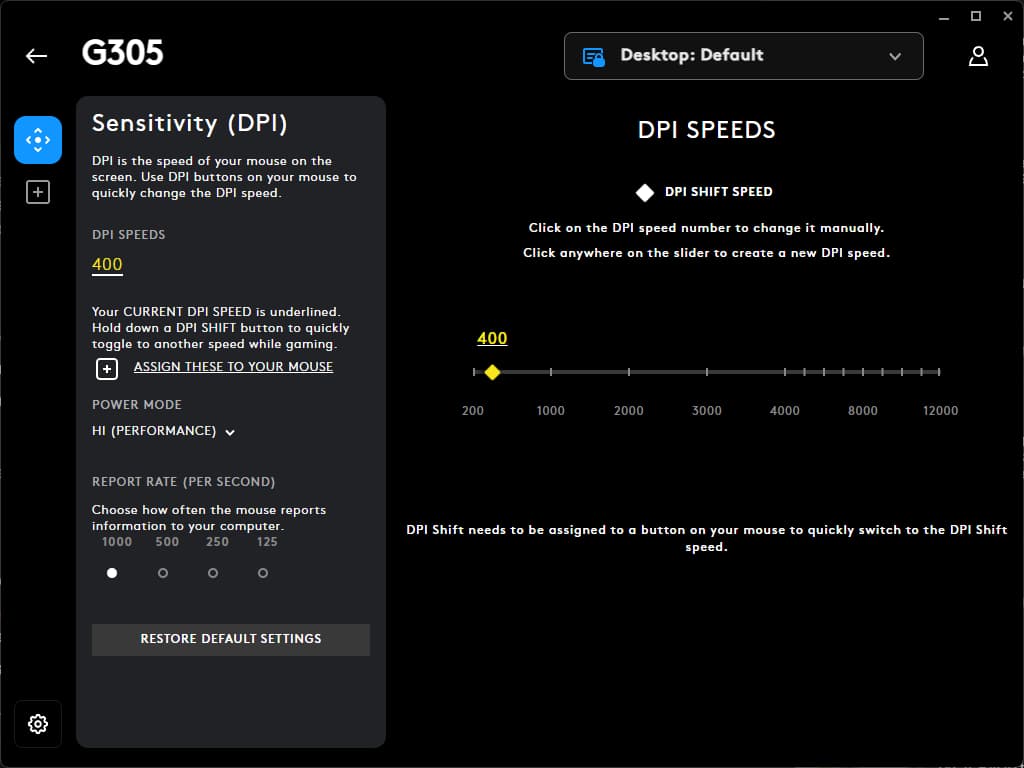
Having multiple DPI stages can confuse recoil scripts or cause inconsistent behavior. By locking in one DPI, you keep your aim consistent, which helps the script calculate recoil drops correctly.

6. Disable Default Key Functions on Macro Buttons
- Open Assignments: In your mouse’s settings, click Assignments (or similar).
- Unbind Macro Keys: Find the buttons you plan to use for macros (e.g. side buttons). Click each and set them to Unassigned or Disable.
- Leave Them Blank: Don’t bind these buttons to any default game or OS function.
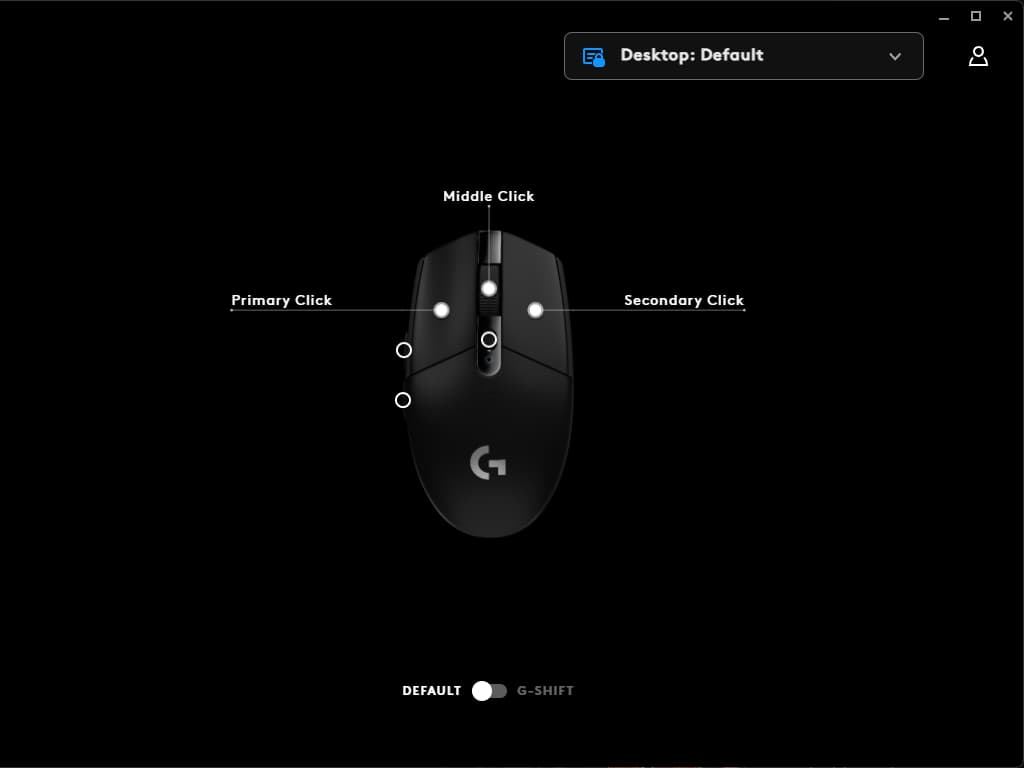
If a button still has a normal action bound, it might conflict with your Lua macro. Clearing out the default functions ensures that pressing the button only triggers your no recoil script, not something else in-game.
7. Use Only One Profile (Set Desktop as Persistent)
- Go to Settings: In G HUB, click the gear icon (settings).
- Set Persistent Profile: Under Persistent Profile, select Desktop and confirm. This makes the Desktop profile “stick” as the active profile.
- Assign Macros to Desktop: Instead of attaching your macro to a specific game, go to Games & Apps and pick the Desktop profile.
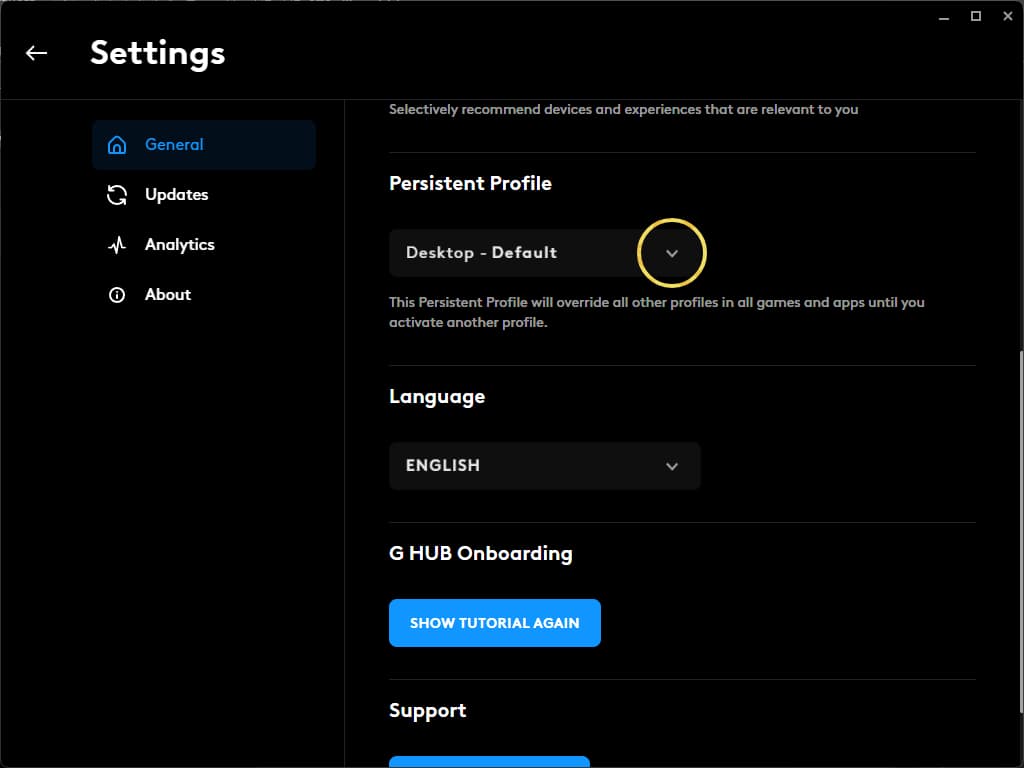
Logitech G HUB can get glitchy if you have tons of profiles. By using just one profile (Desktop) as persistent, you avoid profile-hopping issues. Many in the community say forcing a persistent Desktop profile helps the macros work consistently. Now all your scripting happens on one profile, and G HUB won’t freak out about switching contexts.

8. Create Your Lua No Recoil Script and Assign Buttons
- Create/Import Script: In the Desktop profile, click the + (or Scripting) tab to add a new Lua script. Paste your copied no recoil
luascript. - Adjust the Settings: Once the script is loaded, adjust the settings to your liking.
1mouse left button,2mouse right button,3mouse middle button,4and5are the side buttons,6is the DPI button.
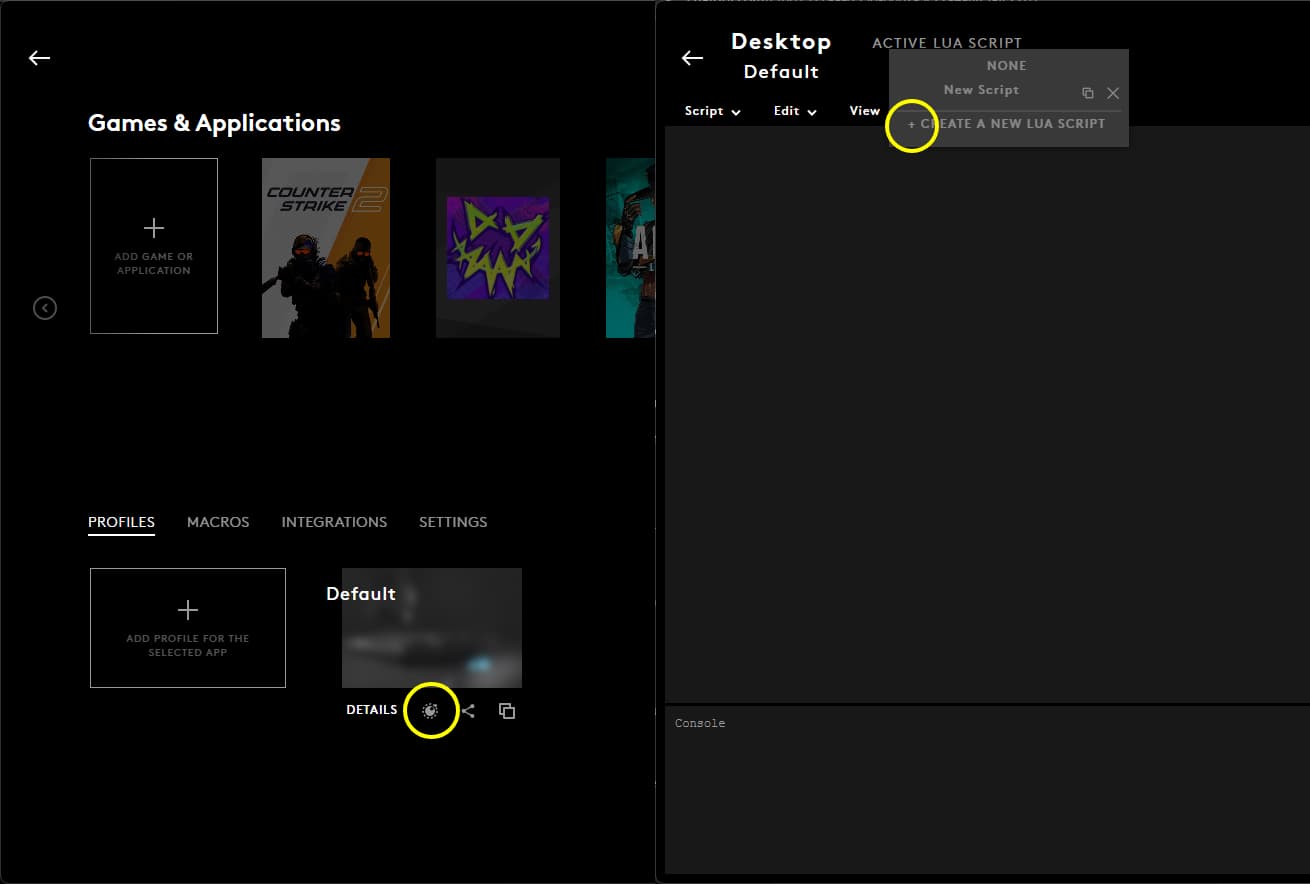
This step actually loads your no recoil macro into G HUB. You’re telling G HUB which button will activate the script. Make sure you save any changes. Now G HUB knows about your script and which button controls it.
9. Save and Activate the Script
- Save & Run: Click Save and Run on the script page. This turns the script ON.
- Test It: Press your macro button (the one you assigned).
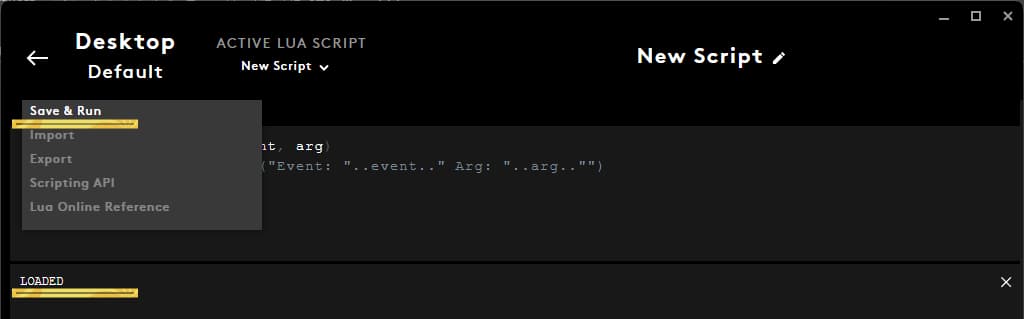
Notice the “LOADED” indicator (like in the image above) - that means the script is active. It’s a good idea to test it out in a practice match or shooting range to make sure the recoil is being compensated.
10. Reload or Re-Import If Macros Stop Responding
- Reload the Script: If mid-game your macro suddenly stops working, go back to G HUB and hit Save and Run on the script again. This reloads it.
- Restart G HUB: If reloading doesn’t help, completely quit G HUB and restart it, then reload the script again.
- Re-import if Needed: In rare cases, delete the script and re-import it as a fresh Lua script.
Sometimes G HUB scripts just glitched out. Restarting or reloading the script usually fixes it. Think of it as giving G HUB a quick reset. Once reloaded, your no recoil macro should work again like before.
You’re Ready to Game
Congrats - you just fixed your Logitech no recoil script! With these tweaks, your Logitech G HUB script not working issues should be gone. Now go dominate in your favorite FPS! Keep in mind: always double-check you’re using the right sensitivity and practice safe gaming (we don’t condone cheating). If problems persist, make sure G HUB is fully updated or consider reinstalling it.
Hopefully this guide helped you fix Logitech G HUB script problems in a snap.